Where world class ingredients meet culture.


Photos by Taste Sonora
By Juan Parada
Just like tacos have taken over the U.S., so have the hot dogs in Sonora, officially knowns as Dogos. What makes them great? It's the special bread created just for them. Soft and fluffy inside, rectangle-shaped, oversized purposely to fit up to 2 beef franks inside along with a boat-load of toppings (not shown here to highlight the bread). Built like Noahs Arch, it can literally hold an unsafe amount toppings with no oceans to keep it afloat but your two hands.
Just like tacos, dogo styles vary from town-town, with the bread being the common denominator. I'll be honest, it took me 5 rounds before I got this right. So here are a couple of things to keep in mind before starting. Ambient temperature. I worked in 80-82 degrees in my kitchen. All ingredients to be at room temperature. Get ready to work your mixer hard. I have a Kitchen Aid 6.qt version and it got hot at one point. Determine the size of the franks to be used. Lastly, get your yeast ready before hand. Whether you're using fast acting or instant, make sure it's set before you add it. Note: this recipe was provide by Molino La Fama. I took some liberty to adjust due to the difference in climate in Los Angeles. Okay, lets get started! Ingredients:
Toppings for your Dogo: Bacon for wrapped Tomatoes Grilled onions Diced onoins Mayo Nopales Guacamole Salsa de Aguacate Chorizo Various grilled chili peppers Diced jalapeño Pickels Relish Mushrooms About 2-4 types of cheese Beans (whole or smashed) Salsas And any more a particular vendor may offer To mention a few.
Step 1: Add all dry ingredients and mix. This step happens quickly. Next, add your 2 eggs and set to a medium speed setting. Do not expect your dough to thicken at this point. With the mixer still set to a medium speed, add your activated yeast. I did my yeast using the warm liquid milk option. Slowly pour it in and allow it to mix well. If you're using water, introduce it slowly to the mix. After adding the yeast and liquids, the dough will look like "Image 4" above. Remember, if you're using liquid milk and/or water combination, the total ml's of liquid should not exceed 600ml.
Sigh, they're all in. Let's begin to mix! Depending on your mixer, you way many to stay close by. Mix for 8-12 minutes, set to medium speed . During this process you will begin to see the dough thickening. The dough will begin to peel off the walls of the bowl and eventually stick to the hook. Once it's at this step, lets check the consistency. See "Image 6". Is will be elastic, but if it is sticking to your hand like a kid eating a chocolate cake, you may want to mix it more. Note, it will always stick but you want it to a bare minimum. Once your mixer begins to smell like a firework, just kidding. The dough should be very elastic, sticky but not adhering and the viscosity of silly putty, you're done. See "Image 7".
Step 2: Let's get rolling. Grease the baking tray. Create a ball of about 150 grams. Be tough, it won't cry. Roll in back and forth until you get the length you desire. The prank size will predetermined this. Try not to tapper them. Place them close but not touching. This step is critical to achieving the shape of the bun. My tray is a half size tray. I was able to fit 5 at the angle shown. Note, the smoother you can get the surface, the better looking the bun will be once it's baked.
Step 3: Let it rise! Again, depending on how well you activated the yeast and the ambient temperature, this step will take from 45-90 minutes. Being November in L.A., I went all the way to 90 minutes.
If you look at the images above, you can see by placing them closely, it allowed them to expand towards each other side ways, thus forcing them upwards. This will give you the iconic Dogo bun shape. The opening surface is not the top part, its the side. So please make sure you get the previous step correct to achieve this. As for creating a golden brown finish, there are three ways you can do this. You can do nothing. You can mix an egg and sugar (remember about ambient temperature), or like panaderos in Mexico do it, premix shortening and oil and rub it on the dough before it starts to rise.
Step 4: Bake at 350 degrees fahrenheit for 14-18 minutes or until the desired golden brown look you desire is achived. One kilo yields about 9 medias noches using 150 gram per ball.
NOTE: THESE ARE SERVED STEAMED BEFORE SERVING FROM A REAL SONORAN VENDOR. IF YOU OWN A STEAMER, IT IS A MUST YOU DO NOT SKIP THIS STEP TO EXPERIENCE THE TRUE AUTHENTIC TASTE.
Step 5: Serving. The skies the limit here. You can bacon wrap the beef frank or even wrap the media noche and grill it before serving. Franks can also be combined with sliced peppers of your choice along with melted cheese before going in. The wheat bread is part of the show, just like most Sonoran plates featuring wheat.
Buen provecho! 
All photos by Taste Sonora
By Juan Parada
If you had no idea, la tortillas de harina is from the region of Sonora. It can even be argued that the creation of the burrito as well. These aren't bold claims, it's just most have forgotten in the past centuries. That is why we are here folks. With that said, we have a new comer to Souther California, a 85 year old wheat mill called Molino La Fama, based in city of Hermosillo, the capitol of Sonora.
Using their recipe and their product you will get an authentic taste. The shape and thickness are all up to you though. This is a skillset many do not bare, not even in Sonora. With a little help with old tech, you to can achieve the perfect tortilla de harina, eventually. Thickness and size vary from taco to taco, burrito to burrito. Depending the experience you're looking for. So don't worry, no one can judge. I used a hand press for this recipe. Using a heated hand press is even better as the tortilla will hold its size and will not shrink as much. Frankly, the harina is part of the taco and should be major part of the experience. What I aimed for was a 6 inch but got about -5+ inch tortilla. I did get smaller ones that didn't make cut. Your first time will not be a 100% success so don't stress out. Your results will be a thick for two reason, you're not an expert and second, this variation of their harina is for general purpose and tends to be more for breads and some pastries They have a specific brand for only tortillas that is not yet available in the states. This is a secret most master tortilleros hold. Let's get started! List of Ingredients :
List of hardware needed :
Tips: Use warm water. You may want to add some more salt than stated. I felt it wasn't enough and I personally don't eat much salt.
Step 1: Mix the harina and salt in a bowl. Do this with the same bowl used with the mixer. Once you got it well mixed, add your shortening. Attach the dough hook as its the closest to hand mixing. If you don't have a mixer or want to become a expert even faster, use your hands and follow the same steps. Start to mix all three ingredients until the you get a consistent mix. If you're using a mixer, you equate to something like a soft ice cream easily scooped. (Image 7).
Step 2: Add water slowing, very, very slowing. By hand you will have to pour and mix about 10-15 times for this recipe. Now with the mixer do this in a low setting and add water gradually in the span of 6-8 minutes until you get the texture needed to proceed. See "image 10/11". The dough will stick to the hook versus the side wall of the mixing bowl. That's a good indication it's ready. If you're doing this by hand, make a ball out of it and roll it side-to-side on the surface of your work area. If you get a similar texture and reaction, then you're good. Note, you're doing this by hand, you will need to insert those fingers deep enough to get through this.
Step 3: At this point you should have a defined working area for this next step. I would recommend a large baking sheet to place the balls of dough you're about to make. Add some harina to the tray to prevent the balls sticking. Grab and pinch about a 30 gram ball. Hold it between both palms and softly massage in a circular motion into a smooth finish. Do not smash it. Just imagine you are holding a fresh egg doing the same thing to it but without breaking it. Reference "image 16" above to compare a ball that is not smooth (right) to one that is (left).
Step 4: Before you start pressing, turn on the stove and place your comal and set it to a medium heat. The weight of the ball is important so you can maintain a consistence finished sized of the tortillas. This way you can use the same pressure throughout the tortillas pressing process. Press and hold for about 5-8 long seconds and you should get what you see in "image 20" above. I used wax paper to line the press. You can also use a sandwich size plastic bag cut on both edges. Place the raw tortillas QUICKLY on the comal and hold it down with the spatula for about 5 seconds. This will reduce the shrinkag. Flip it to the opposite side and REPEAT. Then flip it back to the original side and cook to your preference.
Since this recipe yields a boat load of tortillas, I recommend cooking to 65-75%, cool down, package and store for up to 5-7 days. You'll even have extras to give away. When you feel like having a freshly cooked tortilla, just preheat the comal and cook the remainder of the 25-35%. How can you tell it's cooked 100%? Easy, if it looks "wet" just like "image 22/23" it's not done. Usually, you get a soft white surface to the tortillas indicating its ready to be eaten. Note: in some cases you will not achieve 100% as there are so many uncontrolled variables like flame strength, heat distribution, thickness of the comal. Not to mention ambient temperature. There is a reason why tortillas de harina come from Sonora, THE DESERT HEAT.
Step 5: Enjoy.
A reminder, this will take some time to perfect. Get a heated press if you want more control and consistency of the end result. Here is a hidden cookie for those you actually read the whole post. Set your room temperature to 78-82 degree (85 if you can tolerate it) about 3-4 hours before and let all the ingredients set to that ambient temprature. Just like in color theory, color is affected by its surrounding color. Wheat is affected by ambient temperature. This differs throughout the whole world– especially a desert region. 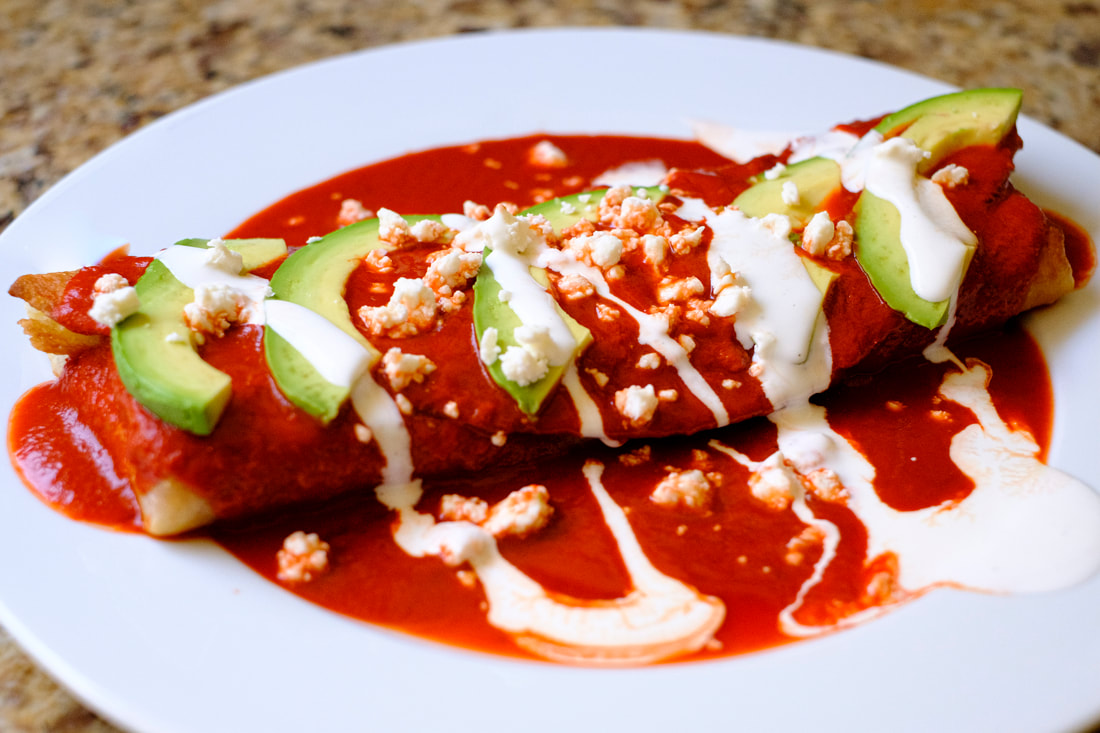
All photos by Taste Sonora
By Juan Parada
Taquitos Mela is a cenedureria (a homes front portion opened to make and sell homemade food) in the city of Hermosillo, Sonora. They make one of best chimichanga I had ever tasted. I grew up with chimis my whole life and my mother never made them this way. Their menu consist mostly of fried foods, labeled as "La Casa de la Chimichanga Especial" their version is composed of a thin tortillas de harina, fresh and crispy, not over filled and with layers of flavors. There is only two options available, carne con papa or beans. Every time I pass through Hermosillo, I have to make a pit stop. Chimichangas are a traditional food from Sonora – Taquitos Mela just takes it up a notch.
Special thanks to my Tia Anita and Tio Victor from Hermosillo who introduced me to Mela back in ~2009. This recipe is inspired by Taquitos Mela. Let's get started. List of Ingredients for the Chile Colorado:
Makes about 4-6 servings Ingirents for the Chimichanga:
Besides the count on tortillas, serving is dependent on preference. See final image for suggested amount per chimichanga.
Step 1: Let's start by removing all the seeds (1). Cut the stem off then split the chile in half, then gut the chile. Make sure to remove all the seeds (2) or else someones going to be very upset with you, including yourself. Doing this guarantees 99.9% no spice. The .1% is if you didn't listen to me on the previous step. Next, grab a pot, add your water, chile, onions, garlic and cumin. Not in that particular order. Boil until the chiles softens to a tender feel. I covered it but maintain a close eye to avoid spillage. Boil no more than with a medium heat. Make sure to wash you hands after handling this chile.
Step 2: Depending on the size your blender, I dump the whole pot into it. If not, do this step in batches according to your blender size. Use the same water you boiled the items with. Just like the beans, do not over fill with water, add be as you go. Start to blend, you might want to blend in various modes. I started low for a couple of minutes. Then on high for no more than a minute to get every little piece finely chopped as I will not strain. Why? I want to maintain the thickness of this sauce as much as possible. If you happen to go ver with the water, use starch or flour, whatever is handy. Add salt during this step. Make sure to taste it. Adjust accordingly. Blend and then you're done with the sauce. Onto the rest.
Step 3: On to the burrito. Wait, before you combine this baby, lets warn it up, this makes the folding easier and you avoid breaking the thing. Heat your pan with about .25 inches of preferred frying oil. Set heat no more than medium. Grab and open the tortilla and place the beans dead center (I used our bean recipe here). Create a semi-rectangle shape. Fold the left and right sides by OVER folding then set back to spread beans. Do the same for the bottom. Then, fold the whole burrito up TWO times. You should get the opening on the botton of the burrito. If you're wondering why im calling it a "burrito", its still a "burrito" until it meets the oil. Let's proceed. Place burrito with the opening on the frying pan with the opening facing towards the bottom. This assures your burrito, now becoming chimichanga doesn't open on you when you flip it for the first time and also doing this maintains its preferred flat shape. This is important, get a good deep fried chimichanga. Once a golden brown chimichanga emerges, place on some paper towels to soak of the left over oil off.  Home made Chimichanga Mela style / Photo by Taste Sonora Home made Chimichanga Mela style / Photo by Taste Sonora
Step 4: Final step, add the goods in this order. Chile Colorado, sliced avocado, sprinkle some lettuce (not shown, I don't like lettuce), pour your table cream and then finish off with the cheese. Add as much cheese as you like, no ones going to judge.
Note: This recipe is a mere recollection from the many times been I visited Mela. The key here is to created a well-layered without over filling the dam burrito. This is not an American burrito simply fried.
Step 5: Final step, repeat as many times creating the chimichangas because once you start eating, the last think you want do is go back to step 1.

All photos by Juan Parada / Taste Sonora
By Juan Parada
Hold the lard said no Sonorense. These beans are truly a staple, not just to any Mexican, but a Mexican from Sonora. Paired perfectly with flour tortillas. Handmade preferably. But what isn't.
Good enough for dip, in a taco, burrito, make sure you have adequate storage for this beans. You will not want to not have these around for the next couple of days. Okay lets get started. List of Ingredients:
Servings 8-12
STEP 6: Run back to the store because you forgot flour to make the tortillas de harina.
We recommend reading this How to make tortillas de harina.
|
Categories
All
Archives |


 RSS Feed
